22.8.11

Make your own MONOPOLY


It was my mom's 60th birthday, and we were planning to go on a family vacation. My sisters and I wanted to make her something special, and one of the many things that we produced for her birthday (T-shirts, private movie screening, photo album, a short clip etc..) we also decided to make her a costume monopoly board, featuring some of the milestones in her life.


I could not have done this without finding this amazing monopoly - photoshop template created by Brad, and without the help of my lovely, two older sisters.
Here's what you do:

Plan your board. decide what do you want to write in each square. Download the Photoshop files from Brad's site. Change the squares according to your plans, add photos or cartoons when necessary. create the property cards accordingly. Note that the board size is about 60x60cm, though you can always make it smaller.

Decorate the board with family photos. That's a matter of preference and taste. Just make sure you have some family photos on the computer, crop them as desired and add them to the board. Best is to use the "Extract" command in photoshop (under the filter menu).
Chance / Community chest- we changed that to surprise/ greeting. the thought was that the players will fill the cards with greetings for my mom and surprise gifts or tokens they wish to give her. we made some empty cards for that purpose.
Make the houses and hotels. we couldn't find any Monopoly hoses on stores and it was too late to buy some on ebay, so we made some. We bough 1x1cm wooden cubes. For the houses, we glued little roofs on them  made of a red paper stripe. For the hotels, we just glued two cubes together.  
Make the money. since it was our mom's birthday, we chose to make money with her face on it. We took a good profile picture of her, used the sketch filter in photoshop and placed her face in the center of a Monopoly bill. After I had that, I just changed the value of the bills. You can then print the bills on colored paper, and get some costumed Monopoly money. 
Make the players. we had a lot of ideas, but due to shortness of time we choose some figures out of the "toy a day" site. we made little heads of the family players and glued them on the folded toys.
 

We printed the board in a printing shop along with everything else, but if you have a colored printer you can print the things at home. We glued the board on some hard board carton to make it strong enough, and to make sure it doesn't wrinkle. We also made a box out of used carton.  
That's that. I can not say that it's not a lot of work, cause it is, but it made our mom so so happy, so I guess it was worth it.

Happy birthday mom!


20.8.11

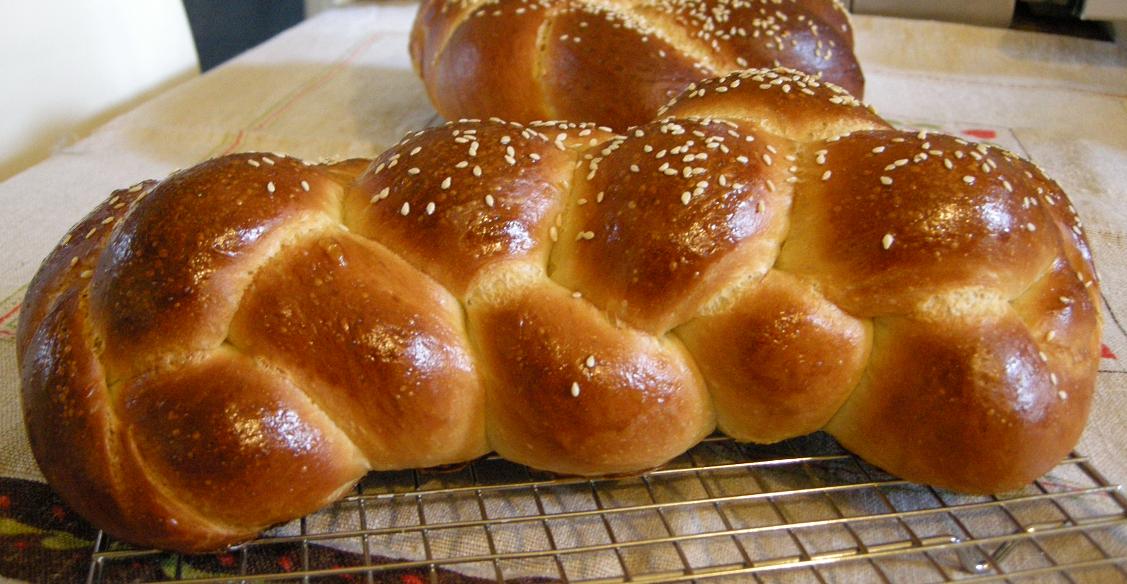
The BEST Challa

I did not write in a very long time, I know. but hey- I was finally doing some of the things I should, like writing papers and taking exams and other obligations. add to that the social revolution we have going on, and that leaves me very little time to write, or procrastinate, or both.

(check out the revolution chronicles page, in Hebrew)

So I'm making up for all the "not writing" by sharing with you the recipe for the BEST Challa you have ever tasted. It's tall and sexy, smells wonderful, with a sweet aroma and a perfect crumb: Not fibery-like the 4-bread Challa, not a crumb like the simple Challa, that yields a great bread that is too low to my taste- but a perfect, tall and lovely soft soft crumb. Can't really describe it. You'll have to try.


BEST Challa
this recipe will yield 2 big loaves, ~600gr each

Ingredients:
4t dry yeast (24gr)
1 1/4 cup warm water (300ml)
1/3 cup sugar (60gr) +1t
1t salt
40gr olive oil
~6 cups bread flower (650-700gr)
2 eggs
10gr baking improver (1T)
17gr gluten powder (~2T)

1 egg yolk with 1T of water
sesame seeds

 Method:
  1. Put the dry yeast with 1 teaspoon of sugar and a bit of the water and wake them up.
  2. in a mixer bowl, mix the flowers, the sugar, gluten powder and baking improver and salt.
  3. add the waken yeast and the rest of the water, and mix.
  4. add the oil; scramble the eggs and add them too.
  5. Mix until you've reached a medium-high level of  gluten development. The dough should be soft to touch.
  6. let the dough rise in a lightly oiled container until doubled, 40min-1hr. Make sure you don't over-proof it, or it won't rise when you bake it.
  7. Deflate the dough, divide to two batches (for two loaves) and then again to 4 (I made 4-strings Challa). Preshape the dough into small rolls, and let rest for about 5 minutes. Open the rolls into strings (like in a baguette) while gently pressing with both hands and rolling the dough roll on a lightly flowered counter. 
  8. Braid your Challa (braiding instructions here) and rest for about 45min, covered in a plastic bag.
  9. Cover the loaves with egg yolk diluted in water, and spread some sesame.
  10. Bake 240C for 20min with steam, then 180C 20 min without steam. If it's already golden after first 20min, cover with baking paper to avoid burning. 
 Of course, this was submitted to YeastSpotting (:

2.7.11

a new little elephant is born

We were really excited this week when our friends first baby boy was born, so tiny and lovely. As the proud father is a collector of elephants- we've decided to make them an elephant mobile.

There's no tutorial this time, though making something like this is not very complicated... all you need to do is decide what stuffed doll you want to hang, create a paper model, copy it onto a fabric, cut, saw, stuff with something and hang from a stick. My lovely husband helped with all the tying and stuffing of the elephants, and also with deciding which fabrics we should use. We added some paper beads in between to make it more colorful.


to our dear friends-- Mazal Tov (:

29.6.11

the BEST EASIEST PASTA you ever ate

well, as promised and after each of you have their own dried-tomato jar just waiting to be eaten in the fridge, here a recipe for the best and easiest past you ever ate. Its low fat, and uses only stuff you already have in your fridge (one of them being dried tomatoes, which are a must).

Dried tomatoes, mushrooms and onions pasta
you will need:
a handful of  dried tomatoes
a handful of black greek olives
4 garlic cloves
1 onion
12 nice mushrooms
~20gr Brinza cheese (salty, sheep milk cheese, comes in blocks)
half a pack (250gr) short pasta

*needless to say, all the amounts are only a recommendation and you can add or subtract anything.


What you do:
  1. While you boil water for the pasta (with a spoon of salt, no oil), chop the onions and the garlic. keep them separate.
  2. Cut the mushrooms into thin slices, or into 1/8 if you prefer them more bulky.
  3. By now, the water should have boiled. put the pasta in.
  4. Heat a deep pan with some of the tomatoes olive oil. Put the garlic in first, and after 30seconds, put in the onion. Make sure the garlic doesn't burn, or it will taste bitter.
  5. Take out as many dried tomatoes as you like; chop them coarsely.
  6. Remove the olive pit from your olives, and cut them coarsely too.
  7. When the onions are slightly golden, add the mushrooms. you can add some black pepper and nutmeg. DONT add salt.
  8. Cut the Brinza. 
  9. When the mushrooms turned soft, add the chopped tomatoes and olives to the pan. let it sit for a few minutes, in the mean time, take the pasta off the stove. drain the water; DON'T wash the pasta. put some olive oil on it, and stir. add the pasta to the pan, and let it sit. don't forget to stir. add the Brinza and some fresh, basil leaves. Stir some more, until the cheese starts to melt. 
  10. Serve hot, or cold (: 

BE-TE-AVON!! (Hebrew for bon apetit!)

      20.6.11

      Considering Challa: Aiming High


      You all know what challa is.
      that soft, sweet, tender, lovely bread that Jewish people usually eat on Friday evenings.
      so many times have I made Challa; it was actually the first bread I ever made, and that first, easy lovable product is what initiated my current love for bread baking.
      The perfect Challa for me is a mildly soft, thin crust with tender, soft crumb that melts in your mouth. it's excellent when its fresh with anything, especially for dipping in your egg at dinner, but also toasted, with salted butter on top.
      After not baking Challa for a very long time (started meddling with sourdough and such), I had an urge for something made of just plain yeast, and it was Friday, and we went to dinner, and making Challa was obvious.
      I didn't want to use my regular recipe- though it yields a great bread, its always somewhat flattens during baking. So I tried a recipe for Saffron Challa (without the Saffron) by Sussan of Wild Yeast that I slightly adjusted. Her recipes never let me down, and the bread in the picture looked just gorgeous.
      did only 2/3 of the amount (small oven and all):

      (no saffron) 4 eggs Challa
      adjusted form Wild Yeast
      (yields 2 500g loaves)
      Ingredients: 
      400g flour
      200g high-gluten flour (used Shtibel #2 for bread)
      200g warm water
      7g instant yeast
      11g salt
      34g sugar
      54g egg yolk (a little less than 3 from #2 eggs, I weighted)
      66.6 whole egg (1 egg and a bit, #2, weighted)
      45g olive oil


      Method:
      1. Wake up the yeast (not a must): put the dry yeast in a small bowl with a tsp of the sugar and 1/2 cup of the warm water. mix gently, and let them sit while you weigh and measure all other things.   
      2.  Combine all of the dough ingredients in the bowl of a stand mixer. Mix on low speed until just combined, then mix on low or medium speed until the gluten has reached nearly full development (great explanation in Wiled Yeast blog!). 
      3. Transfer the dough to a covered, lightly oiled container. Let it sit for 2 hours. After the first hour, gently press the dough to degas it (Forgot to do that all together!).
      4. Turn the dough onto a very lightly floured counter and divide it into pieces of about 500 g each. Further divide each piece, depending on the number of strands you want for each loaf.
      5. while dividing, pre-shaped the dough into chubby sticks and let them sit for about 10 minutes. then I rolled the sticks into forming longer strings, like when you shape a baguette.
      6. Braid or otherwise shape the dough as you please (see shaping notes in Wiled Yeast. I braided a 4 strings braid and tried the spiral-circle thing that opened in the oven). Place shaped loaves on a large parchment-lined baking sheet, spaced as far apart from each other as possible.
      7. Beat one egg with a fork and mix it with a teaspoon or so of water. Brush the egg wash lightly onto the loaves. Save the remaining egg wash.
      8. Slip the loaves into a large plastic bag or cover with plastic wrap. Proof at room temperature for 1.5 – 2 hours, until the dough springs back very slowly when pressed lightly with your finger.
      9. Meanwhile, preheat the oven to 380F.
      10. Before baking, give the loaves another light coating of the egg wash. Throw a few ice cubes in the bottom of the stove to create steam.
      11. Bake the loaves for about 30 minutes, until the crust is a shiny dark brown.
      12. Place the loaves on a wire rack to cool.


      Outcome: 
      great loaves, though they reminded me somewhat a bought Challa. The crumb was soft though slightly stiffer than I like, a little too chewy. Also, since I'm married to a cholesterol-problematic guy, this thing has a little too much eggs for me. But what a hight!!


      this turned out so nicely it was submitted to Wiled Yeast's YeastSpotting (:

      LinkWithin

      Related Posts